Showing posts with label diy. Show all posts

Thursday, November 6, 2014

Children's DIY Playroom Market Center

Check Out this DIY children's Market! A creative way to maximize space and delight your child all at the same time!
{Step by Step Link Below}

DIY PVC Children's Grocery Store {Tutorial} - So You Think You're Craftyhttp://www.soyouthinkyourecrafty.com/pvc-childrens-grocery-store/

Tuesday, January 14, 2014

Adding A Bit Of Color.

 Hello friends! Please, come in and sit down! 
For todays post I thought I would do something a bit different and give you all a little look behind the scenes of my Home Decor life. Now as those of you who've gone to college or have lived in an apartment will know, when it comes to decorating your home you are very limited to your options. This is especially true if you're wanting to add a little color to the mix. 

While embracing the bland life that some apartments try to talk you into might be easier (and slightly less expensive) color is necessary and an essential part to ones happiness. Or at least mine. 

Knowing that I wanted to add some more color and life to my humble abode, and, that I didn't have the option to paint or do crazy things like that, I had to get a little creative with the ways I chose to pull in my colors. After spending millions of hours on Pinterest, and raiding the paint chip aisle at walmart for color schemes, I finally came up with some ideas that I think came together pretty nicely. 

Here is a breif look and what I ended up doing :)  


Have a lovely day! 


Friday, December 20, 2013

Vinyl Blocks

For today's post I thought I would give you all a little sneak peek into the creative (or at least somewhat creative) life of yours truly. 

Now when it comes to Christmas presents I almost always have these grand plans to buy hundreds of dollars worth of stuff that is going to blow people's minds. However, almost every year, without fail, I end up forgoing this idea for homemade presents. I don't know what it is exactly, but there is just something so special about making presents from scratch that keeps me coming back to homemade gifts time and time again. Here is a look at the Holiday Blocks I made for my sister this year using some really lovely scrapbook paper and some vinyl lettering. I think it turned out pretty cute :) 


Have a lovely day! 


Monday, December 2, 2013

Christmas Advent Book

When it comes to Christmas almost every family has their own set of traditions. For me and my family it is new PJ'S on Christmas Eve, for my sister's family it is a candlelight dinner, and for Lynette's family it's a new Christmas book. 

Traditions are the best and a big part of what makes the Christmas season so special. However, being a tradition usually means you know what's coming, so, finding new and unique ways to go about doing them helps to keep a sense of excitment and wonder. 

The Christmas Book Advent is a new (and pretty dang cute) way to do two traditions in one. 


 Here is how it works.

At the beginning of December you wrap, in all their cute christmasy glory, 23 different Christmas books. These can be new, old, whatever you fancy. 


After that you wrap one brand new Christmas book and add it to the mix (the trick is to not let your kids know which book is new and which book is old) 


Once all of your Christmas books are nice and snug in their wrapping paper you can add on one number for each day leading up to Christmas. 


The fun thing about doing your Advent this way is that your kids have no idea what day they are going to get their new book. Can't you just feel the anticipation and excitement!!? 


So there you have it! An adorable new way to do an old tradition. 
ANDDDD... (just to make things even easier) here is a link to a free print of the cute little numbers you see on the presents above. 


Go forth and craft. 

P.S. Just wanted to remind you all that today is the LAST DAY to take 25% off your order! Don't miss out!  

Wednesday, June 27, 2012

Crate Coffee Table How-To

Very few DIY projects seem to look this good and practical! I found this adorable tutorial here.


Saturday, June 23, 2012

Make Your Own Nail Polish!

Do you have extra eye shadow laying around? A favorite color that would look great on your nails? Look no further! Here's a great tutorial that I found here.


Click here for the full instructions!

Friday, June 15, 2012

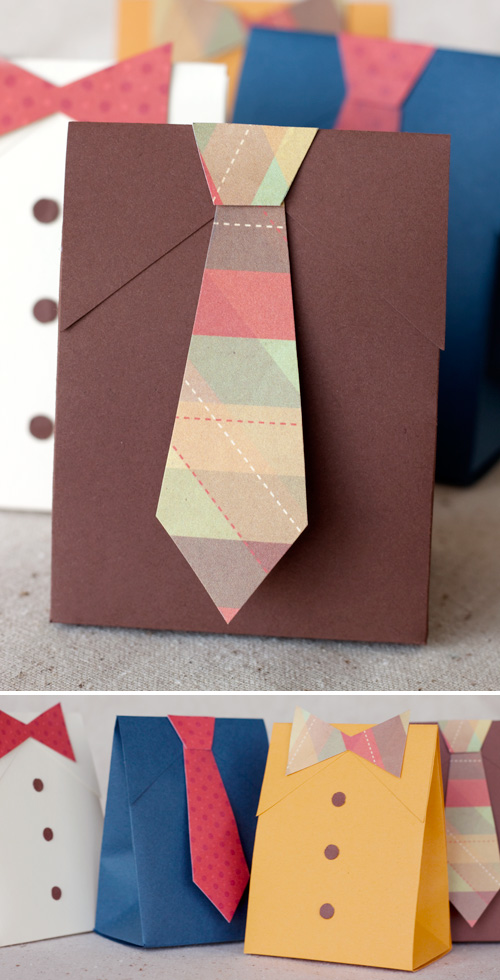
Father's Day Gift Bag DIY

Every Father's Day, I end up getting my dad the same thing: a sweet tie from the mall. Of course, he appreciates it and all, but there are so many other creative ways to show my appreciation and love for the man who raised me. Here's two of my favorite crafts that your kiddos can join in on, too!

1. Shirt & Tie Gift Boxes 


Full tutorial HERE.

2. Folded-Shirt Card


Full tutorial HERE.

Happy Father's Day! I hope you all find a way to let your fathers/husbands know how cool they are :)

Wednesday, June 6, 2012

Chalkboard Serving Platter

With my sister's birthday coming up this weekend, I've been trying to find a creative way to present platters.
Thank heavens for Wit & Whistle and their tutorial on chalkboard serving platters! 


Check out the full tutorial here!

Friday, December 2, 2011

Noel - DIY Christmas Project


My Suite Bliss
designed this Noel wall decal for us and created this beautiful board.
You can check out her DIY post on her blog HERE

Wednesday, August 24, 2011

Subway Art!

Okay, this is adorable. And I don't think I'm being facetious when I say it's pretty easy.


Cute for a nursery, right?


And fairly low-cost.


See the full tutorial HERE. 

Sunday, August 14, 2011

Rainbow Car Birthday


My son turned 3 this summer, and he loves rainbows and cars - so we mixed the two together for his birthday theme.  It was a lot of fun, I love colorful birthdays!


My boys and I dipped pretzels and oreos and white chocolate and added sprinkles.  I dipped vintage soda bottles in chocolate and added sprinkles (see tutorial below)


The rainbow cake turned out great!  It's kind of a fun surprise because you don't know what it is going to look like until you finally cut into it at the party.  They take all day to make and feed a TON of people, but they are fun to make and eat :)


Chocolate dipped sprinkle cups tutorial (SUPER easy!)


I grabbed some vintage glasses and soda bottles out of my china hutch and cleaned them.
Then melt your melting chocolate until it is completely smooth.   Dip your cup in just at the rim, for a thin layer of chocolate.


Before the chocolate dries/hardens sprinkle with your choice of sprinkles.

Wednesday, August 3, 2011

Bicycle Bucket - DIY

Biking has got to be my favorite summertime activity by a long shot. I've always wanted one of those cute little baskets for mine, but now that I've pretty much outgrown that, I found an alternative that's adorable for kids. Here's a glimpse of a cute tutorial I found:


Take a look at the full tutorial HERE. 

Wednesday, July 27, 2011

Spray-Painted Glass Vases - DIY

Looking for a super cheap way to liven up your dresser, desk, or house in general? I found this adorable idea from Tattered and Inked. It looks easy, quick, and pretty low-cost.


Aren't they lovely? Check out the full tutorial HERE.

Wednesday, July 20, 2011

Chevron Hook Rack - DIY

Looking for new ways to add a little pop into your house? This chevron hook rack is the perfect solution for old racks with boring or faded colors.

From: The Sweet Survival

Check out her full tutorial HERE


Wednesday, July 13, 2011

Bird Cage Lanterns - DIY

These are adorable!  Found on - The Brides Cafe.


Tutorial courtesy of here (:

Wednesday, July 6, 2011

Pumpkin Cake

Lately I've been craving anything and everything pumpkin. This recipe looks delicious! I found the tutorial here.


PUMPKIN CAKE
NOTE: This recipe is for an 8x8 square dish. Most recipes similar to this are for 9x13, so some of the measurements have been halved, from the original recipe.

Cake bottom:
1 cup of yellow cake mix (you'll also need 3/4 cup of the cake mix for the topping and can save the rest for making this dessert again)
2 Tbls melted butter
1/2 of an egg (more info below)

Pumpkin filling:
1 15 oz can of pumpkin (or 2 cups of fresh puree)
2 eggs, slightly beaten
3/4 cup sugar
1/2 tsp salt
1 tsp cinnamon
1/2 tsp ginger
1/4 tsp cloves
1 can evaporated milk

Topping: 
3/4 cup yellow cake mix
2 Tbls sugar
2 Tbls butter

First prepare the bottom cake layer.
Melt the butter in the microwave or stove and let it cool slightly (so you the eggs don't curdle when added to the mix). Then pour the butter and 1/2 of an egg into the 1 cup of cake mix and stir. (Since this recipe has been halved from the original, it calls for 1/2 of an egg. Whenever I need 1/2 eggs for a recipe, I crack and whisk up one egg in a small bowl and then just pour about 1/2 of the mixture into the recipe. I don't measure exactly since eggs vary in size anyway. (It usually works pretty well).


Press the cake mixture into the bottom of an 8x8 Square dish (which has been sprayed with cooking spray). The mixture will be very sticky, so use a plastic bag over your hand to evenly press it around.


Next, prepare the topping. Mix 3/4 cup of yellow cake mix with 2 Tablespoons of sugar in a bowl. Using a pastry cutter or fork, cut in 2 Tablespoons, till well blended. Set this aside.


Now the Filling.
You're going to make this exactly like you would a pumpkin pie. If you have a small can of Libby's canned pumpkin, you can follow that recipe exactly or use the ingredients listed above (which are from the Libby's can!). Mix everything together with a wire wisk.


And pour it over the bottom cake layer.


Finally, sprinkle the topping evenly over the top.


Stick it in a 350 degree oven and bake for 45 min to an hour.

Now because I doubled the amount of pumpkin filling in this recipe, it takes much longer for the pumpkin to set in the middle. Of course you don't want the top of your dessert to get overly brown in the process. So, I haven't perfected this part yet, but I recommend covering the top with foil for the first 15 minutes or so of cooking (doesn't have to be tight on the pan, just sitting on top of the dish). Remove it during the cooking and let it cook the rest of the time, uncovered.


When you're done, you have this:


Let it cool for a bit, serve with cool whip, whipping cream, or vanilla ice cream, and serve!